
Are you tired of moving and squeaky door frame pullup bars? Here is my DIY recipe for building solid, variable & removable pullup bars.
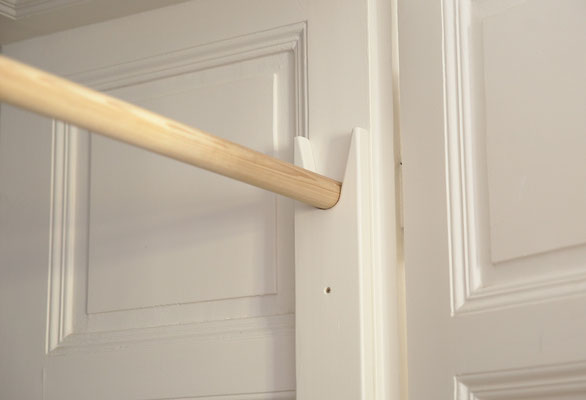
Instead of pressuring the door frame by an expanding pullup bar or attaching all of the weight to the frame itself I always build pillars out of small wooden boards. At the bottom I usually make
a cutaway for the plinth. This way most of the load is transfered to the ground. Start by drilling out holes with the diameter of the pullup bar at the desired height. If you make
various holes, you can move the bar around if someone smaller or bigger wants to train with you or if you want to mount multiple bars. When you are done with the drilling connect the holes
to one side at an angle of around 45 degrees with a jigsaw or whatever you have at hand. If your hole is at the top your cutaway can also face upwards. In most of my cases I had wooden frames so
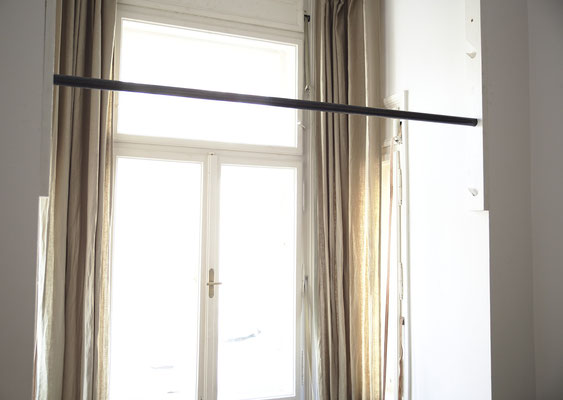
I only had to screw the pillars into the frame to hold them in place after I finished painting them. In picture one I made a bar for this oriel and simply screwed the board into the wall with
screw anchors.
Plans for the future: Mounting the pillars at an angle of 20 degrees as a base for a removable campusboard! Let me know if you got some inspiration from this or if you build one yourself. Have
fun pulling yourself up - the world looks better from above :)


Write a comment
Abraham (Tuesday, 06 March 2018 23:33)
This is cool! Excellent idea!
Birthe (Wednesday, 06 June 2018 19:29)
Hi, I really like your wooden bar. Which wood and diameter would you recommend for a bar of 1,2m length?
Thanks!
Fingerschinder (Wednesday, 06 June 2018 19:51)
Dear Birthe,
For 1,2 m length I would recommend a metal one with a diameter of 35 mm and a wall thickness of 3 mm to be on the safe side. I personally would use ash wood only in tighter doorframes.
Let me know if you have any further questions.
All the best for your pullup bar DIY project.
Cheers,
Jakob
Andrew (Friday, 02 August 2019 14:01)
This is such a great idea, I'd like to make one of these with slots for adjustable heights for my daughters bedroom doorway. Can you tell me the dimensions you used for the wooden uprights?
For the bar I was thinking of using a metal pipe with an outside diameter of 1 ¼", does that sound about right?
Fingerschinder (Friday, 02 August 2019 14:45)
Dear Andrew,
Thank you very much, it's cool to see that someone reads the blog :) The dimensions for the upright were 10 cm x 2,5 cm (roughly 4 x 1) and 4 cm (roughly 1,6) diameter for the bar, both the wooden and metal one. The wooden bar is used in a small doorway while the metal one is used for a wider 1,2 m gap between two walls. These dimensions work fine for my weight of roughly 70 kg.
While a smaller diameter bar is maybe enough for kids I would recommend a wider outside diameter than 1 1/4. A solution like this lasts more than a lifetime so it's cool if it is also strong enough for the whole familiy.
Another point to consider is safety when it is being used by kids. The solution shown above has no locking mechanism that prevents the bar from falling out if you push it upwards or if you drag it towards the "open" side with anything attached to it. Please think about modifying the design and adding some sort of locking mechanism to keep the kids safe.
Train safely and good luck with your own build.
Andrew (Friday, 02 August 2019 16:53)
Dear Jakob, thanks for writing back so quickly!
Good suggestion, I'll go for a wider diameter bar - I think the monkey bars she uses in the park are thicker too.
Great point about safety too. My daughter is 6½, although she's pretty good at being safe but I can imagine the bar could easily come out if enough momentum is generated :) I'll have a think about some kind of locking mechanism that could be added (a shaped peg that slots in might be one possible solution) but I'll let her try it without first while I'm there to see if it's necessary.
Have a good weekend.
Mike (Tuesday, 24 March 2020 16:05)
Love this idea! Is there any way to prevent the bar from rotating, do you have any anti-rotating ideas?
Fingerschinder (Tuesday, 24 March 2020 16:08)
Dear Mike,
Personally I have no problem with it rotating a bit. It only makes you stronger :D I started thinking about securing it with a bolt to make it kid friendly. This would solve both problems I guess. Other than that I can think of using rubber in the cutout. Hope this helps.
Stay safe :)
Tomas (Monday, 06 April 2020 18:24)
My dad is in a wheel chair and we need to make a pull up bar in the door frame for him. Wooden preferably. Problem is, nobody seems to sell those wooden beams that are semi-circular / oval.
I am reluctant to use a circular beam, because it will rotate, making grip harder. Any ideas where to get one of those oval profile wood bars, used in wooden ladders for exercising?
the oval shape would lock the rotation. And the oval shape is thicker in the correct direction, allowing to hold more weight.
Fingerschinder (Monday, 06 April 2020 21:07)
Hey,
Very cool that you are going to build one for your dad. The only one I found available for private customers is the bar of a "Barren". It's quite expensive though:
https://www.sport-thieme.at/Turnger%C3%A4te/Turnbarren/art=1208304
I would use rubber in the opening on the side to prevent the bar from rotating. Maybe in combination with an opening which is getting smaller and smaller to pinch the round bar and prevent it form rotating that way.
Best,
Jakob
Kate (Tuesday, 07 April 2020 04:55)
Hi! Amazing job - Would you be able to make one and ship it to me?
Fingerschinder (Tuesday, 07 April 2020 08:35)
Hey Kate,
We are planing on developing a product after the corona crisis. For now please write me an email to [email protected] to discuss if we can find a solution now.
Best,
Jakob
Gina Milligan (Sunday, 26 April 2020 19:42)
Wonderful idea with clear instructions! I love that your design is an attractive solution, which can blend-in with or even compliment the architectural details of one's home, as well as the fact that the floor bears the load, unlike commercial models which typically utilize the inner frame, or the actual molding around the door. I've never understood how that last (and probably bestselling) design considered "safe" - isn't most molding attached with relatively short, thin nails which are separated by a coupla feet? Unless you have an older house and the molding is effectively glued-on by decades of paint, this seems akin to hanging a bassinet from thumbtacks above a corkboard frame. (Digression over.)
What type of metal rod should I use for the bar itself? Are we talking about a length of aluminum cut from a bathtub tension rod, or the galvanized steel pipe used for chainlink fence posts? Or...what? My kiddo wants one, but he's 6'3" tall and 175 pounds. I don't want him to end up on the floor, glaring at me as though I'd planned it (and he would).
As for some of the concerns people have posted above, I imagine that using a screw to attach a wooden bar to the frame would stop it from spinning, and an easy fix for stopping the bar from falling out is to install inexpensive hook-and-latches to the outside. That would enable you to safeguard the bar from accidentally lifting out of the frame, while affording you the option of being able to raise and lower the bar into other slots. A more permanent solution would be to save the pieces of wood you cut out of the frame with a jigsaw, then fit them back in place once your bar is mounted. You can use a quality wood glue to reaffix them (a professional woodworker friend of mine says that good wood glue can put wood pieces back together with as much or greater strength than it had before the wood was cut/broken; he uses it to repair and restore delicate antique furniture pieces regularly) or, if you aren't concerned about aesthetics, screw those puppies into place. Then finish as desired with paint, varnish, laquer, Swarovski crystals, little fuzzy pom-poms, bacon bits, snozzberries...or, you know, not.
Lastly, for those concerned about grip, pick up a pair of inexpensive weightlifting gloves, or use bike handlebar tape. You could also dip the bar into a few layers that liquid rubberized coating stuff until you have the desired thickness (let it dry completely between layers and especially before mounting), BUT I don't know how well it'll hold-up over time with regular use, so you should probably only utilize that method with a removable/movable bar. Just wanted to share my thoughts things.
Thanks for posting this! I can't wait to get into my hubby's workshop and start buildin'! Just don't tell him that I'm using his woodworking stuff. He's a bit testy about his tools. He hasn't caught on to my use of them in the past, so here's hoping he remains oblivious!
Anton (Friday, 29 January 2021 09:53)
To prevent rotation you and chisel 2 flat surfaces on the ends of the bar and cut the slot to fit the flats.
Fingerschinder (Friday, 29 January 2021 15:41)
Dear Anton,
Thank you for the suggestion. We would have loved to have the product ready by now but covid slowed everything down drastically. Currently we are working with the TU Graz to calculate various mounting options, including one similar to your suggestion.
Thanks again & all the best,
Jakob
Smilyan (Tuesday, 22 February 2022 22:16)
This is an absolutely brilliant idea, I love how convertible, compact and tucked away this solution can be. I am planning to put it across my hallway with a metal pipe between the two doorframes.
Thank you so much for sharing this.
Fingerschinder (Wednesday, 23 February 2022)
Dear Smilyan,
Thank you very much. I am glad you can make use of it. Please follow our social media because we've already produced a commercial product with an additional safety stop, which will be available soon.
Best,
Jakob
Roli (Monday, 18 April 2022 05:52)
Hi Jacob. I really liked you idea and copied it and installed it in our corridor where we have a framed entrance to the bathroom. We used to have an simple extendable bar from eBay but wanted different height options as my kids are from 7 to 14 yrs. I used oak and a seperate piece on wall side as I wanted a more resilient structure which wouldn’t damage the walls (bar the screw holes). My wife liked the timber appearance so much I didn’t need to paint it. I just used some varnish to protect the wood. I have pics I can forward to you if you like.
Thanks so much for the inspiration!
Fingerschinder (Wednesday, 20 July 2022 12:15)
Dear Roli,
Thank you very much for your kind words! It's great that the idea still inspires people to make their own adjustable pull-up bar like you did. I would love to see the pictures. Please send them to [email protected] or simply tag @fingerschinder on social media posts.
Best,
Jakob
Yugan (Tuesday, 27 September 2022 22:03)
Hi, I love it unfortunately I’m not very manual is it possible to order it directly from you guys ?
Thank you �
Fingerschinder (Monday, 21 November 2022 08:31)
Dear all,
Thanks for all the positive Feedback over the years! The Varibar with an addiational locking mechanism is finally available and up for sale in the store. Please order by email and we will send you an offer inluding shipping to your location.
Best,
Jakob
Amarjeet Tura (Wednesday, 19 July 2023 02:43)
Hi this a great idea!
I will use 25mm x 100mm timber strips and an Oak Dowel bar 35mm x 1.0m long.
Hopefully the 2x vertical strips should screw straight into the plasterboard and wall studs.
Thank you very much!